Side Pannel
Fabulous Fall Cupcakes
Fabulous Fall Cupcakes
- Recipe Submitted by Cool Whip on 09/12/2014
Category: Kids, Cakes
Ingredients List
- 2 boxes of white cake mix (substitute your favorite white cake recipe, if you like!)
- Required ingredients for your cake mix/recipe ”“ generally eggs, oil, and water
- Food coloring in fall colors (dark and light brown, orange, yellow, and dark red)
- Mini fall cutters (I have this set)
- Cupcake liners
- Frosting of your choice (I used this pumpkin buttercream recipe)
Directions
1. Prepare one box of cake mix. Divide into 5 bowls (or however many colors you will be mixing). Mix desired color into each bowl.
2. Put each batter into a plastic bag or pastry bag. This will allow you to have greater control of where the colors go ”“ important if you want to make multi-color shapes!
3. Grease a 9×13 cake pan. How you add the colored batter depends on which shape you want to make!
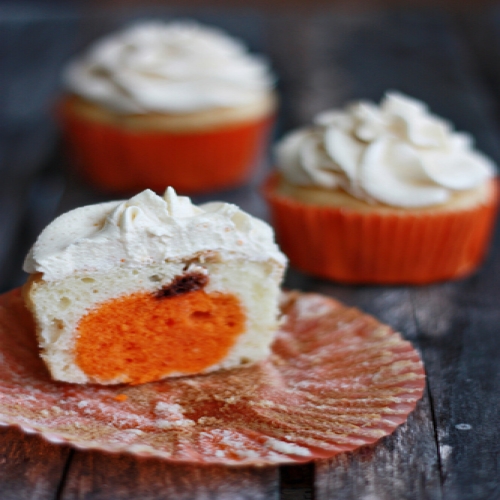
4. To make pumpkins: Using the orange batter in a plastic or pastry bag, “pipe” a thin layer of batter into the pan ”“ make sure it is wide enough for your mini cutter. Then, pipe a smaller layer of dark brown for the stem above the orange.
5. To make the acorns: You should pipe two stripes of dark and light brown ”“ one beside the other.
6. To make the leaves: The leaves are much easier ”“ just pipe random ribbons of batter to fill your pan ”“ orange, yellow, red and brown. Don”™t worry if the thickness of the batter isn”™t even, it won”™t matter when it is inside the cupcake!
7. Bake. Since we”™re probably not using all of the batter (you don”™t want the shapes to be as thick as a normal cake), you should decrease the baking time by approximately 30%. I recommend to just keep checking for doneness throughout the baking process ”“ only you know your recipe and oven!
8. Once the cake has cooled, it is time for the fun part ”“ cutting the shapes! Cut the pumpkins with an orange body and a dark brown stem, cut the acorns with a dark brown top and a light brown bottom, and the cut the leaves so that they are several different colors.
9. Prepare the other cake mix. Line 2 muffin tins with cupcake liners. Put a tiny bit of batter in the bottom of each liner. Add one shape per cupcake. Make sure they are all facing the same direction ”“ it is easier to keep track of where to cut the cupcake to reveal the shape!
10. Add batter around and on top of the shape. It”™ll look a little bumpy, but don”™t worry ”“ that is what the frosting is for!
11. Bake according to your recipe”™s instructions. Cool. When removing from pan, you may want to use a food writer to mark the “front” of the cupcake, so that you know how to cut it to reveal the shape.
12. Frost and serve.
2. Put each batter into a plastic bag or pastry bag. This will allow you to have greater control of where the colors go ”“ important if you want to make multi-color shapes!
3. Grease a 9×13 cake pan. How you add the colored batter depends on which shape you want to make!
4. To make pumpkins: Using the orange batter in a plastic or pastry bag, “pipe” a thin layer of batter into the pan ”“ make sure it is wide enough for your mini cutter. Then, pipe a smaller layer of dark brown for the stem above the orange.
5. To make the acorns: You should pipe two stripes of dark and light brown ”“ one beside the other.
6. To make the leaves: The leaves are much easier ”“ just pipe random ribbons of batter to fill your pan ”“ orange, yellow, red and brown. Don”™t worry if the thickness of the batter isn”™t even, it won”™t matter when it is inside the cupcake!
7. Bake. Since we”™re probably not using all of the batter (you don”™t want the shapes to be as thick as a normal cake), you should decrease the baking time by approximately 30%. I recommend to just keep checking for doneness throughout the baking process ”“ only you know your recipe and oven!
8. Once the cake has cooled, it is time for the fun part ”“ cutting the shapes! Cut the pumpkins with an orange body and a dark brown stem, cut the acorns with a dark brown top and a light brown bottom, and the cut the leaves so that they are several different colors.
9. Prepare the other cake mix. Line 2 muffin tins with cupcake liners. Put a tiny bit of batter in the bottom of each liner. Add one shape per cupcake. Make sure they are all facing the same direction ”“ it is easier to keep track of where to cut the cupcake to reveal the shape!
10. Add batter around and on top of the shape. It”™ll look a little bumpy, but don”™t worry ”“ that is what the frosting is for!
11. Bake according to your recipe”™s instructions. Cool. When removing from pan, you may want to use a food writer to mark the “front” of the cupcake, so that you know how to cut it to reveal the shape.
12. Frost and serve.
Tweet

Recipes by Course
Recipes by Main Ingredient
Recipes by Cuisine
Recipes by Preparation
Recipes by Occasion
Recipes by Dietary


Who loves our Healthy Recipes?

Quick Links
Main Ingredient
Preparation
- Copyright © 2016, CompleteRecipes.com
- Terms of Service
- /
- Privacy
