Side Pannel
Giant Kit Kat Bar
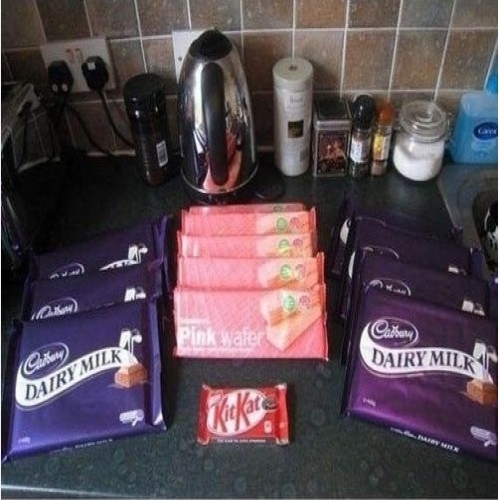
Giant Kit Kat Bar
- Recipe Submitted by Cool Whip on 09/04/2014
Category: Chocolate, Kids, Gifts
Ingredients List
- 30 large European chocolate bars (any type of Belgian/Swiss/French, etc., chocolate is suitable)
- 6 packages of vanilla wafer cookies (not vanilla wafers, but cookies that have layers of wafers with light frosting between layers)
Directions
Create the Kit Kat logo and prepare the mold surface. Before you get your paws on the chocolate, you”™ll need to prep your work area and giant bar receptacle.
Cut out the Kit Kat logo from the floor tile. If you don”™t want to freehand it, obtain an image online, print and trace it onto the floor tile.
Stick the logo to the bottom of your trough, but place it in reverse so that the name appears correctly on top of the bar.
Melt 1/3 of the European chocolate bars. This can be a sticky job, so go with a chocolate melting method that works best for you. Suggestions are:
Double boiler (bain marie). Either use an actual double boiler or create one at home. Using two pans, fill one pan half way with water. Place the second pan on top”“”“you should have a small amount of space between the pans so steam can seep out. Place chocolate in the top pan and simmer on low until the chocolate is melted. Stir often to ensure that the chocolate melts evenly and doesn't burn.
Microwave. Place broken chocolate chunks in a microwave-safe bowl. Place the uncovered bowl in the microwave and cook for approximately 30 seconds to one minute. Remove the bowl and stir. Place the bowl back in the microwave and cook for another 30 seconds to one minute. Repeat this step until the chocolate is smooth and creamy.
Line the bottom of the trough with the melted chocolate. Use a rubber spatula to smooth the chocolate, ensuring that it is evenly distributed throughout the trough. Let the chocolate set for several hours (overnight is the best).
Layer the vanilla wafers along the bottom of the hardened chocolate. Break wafers into small squares or along the intuitive “break” lines and completely fill the bottom.
Build wafers to the top of the trough. You should have approximately five to six layers, filling the entire trough by the time you are finished.
Melt the remaining European bars of chocolate using the easiest method (double boiler or microwave) and pour the chocolate over the top of the wafers.
Pour the chocolate so that it distributes evenly over the giant bar. Ensure that chocolate seeps down each side so that you have a fully encased chocolate bar.
Refrigerate the giant chocolate bar overnight. If the bar does not fit in a flat position in your refrigerator, wait until the chocolate has hardened and then place it in a slightly slanted position. Do not place unhardened chocolate on a slanted surface (in the fridge) or it will end up sliding out of the mold.
When the chocolate has completely hardened and you have a solid bar, spread the wax paper out on a flat surface and prepare to free the chocolate from the mold.
Invert the mold on the wax paper and gently tap the top of the mold to loosen the bar. Continue tapping until the mold can be lifted from the wax paper while leaving the chocolate behind.
Transfer the bar from the mold to your wax paper. Have a friend help by standing on one end and with you on the other to avoid breaking the chocolate when trying to free it from the mold.
Serve. The best way to serve this is to set it out on a large plate or tray. Invite everyone to "help themselves" but do provide a knife or two in case they experience problems trying to break off pieces!
Tweet

Recipes by Course
Recipes by Main Ingredient
Recipes by Cuisine
Recipes by Preparation
Recipes by Occasion
Recipes by Dietary


Who loves our Healthy Recipes?

Quick Links
Main Ingredient
Preparation
- Copyright © 2016, CompleteRecipes.com
- Terms of Service
- /
- Privacy
