Side Pannel
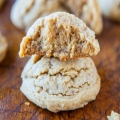
Soft and Puffy Peanut Butter Coconut Oil Cookies
- Prep Time: 10 mins
- Cooking Time: 8 mins
- Serves: About 18 medium-sized cookies
Soft and Puffy Peanut Butter Coconut Oil Cookies
- Recipe Submitted by Love Candy on 03/28/2014
Category: Cookies
Ingredients List
- 3/4 cup creamy peanut butter (use Jif, Skippy, Peter Pan or similar; not natural and not homemade peanut butter)
- 1/2 cup coconut oil, softened (softened to the consistency of soft butter; not rock hard and not runny or melted, see below)
- 1 cup light brown sugar, packed
- 1 large egg
- 1 tablespoon vanilla extract (yes tablespoon, not teaspoon), or to taste
- 1 to 1 and 1/4 cups all-purpose flour (see below)
- 2 teaspoons corn starch
- 1 teaspoon baking soda
- 1/4 teaspoon salt, optional and to taste
Directions
1. To the bowl of a stand mixer fitted with the paddle attachment, combine peanut butter, coconut oil, egg, sugar and beat on medium-high speed to cream until light and fluffy, 4 to 5 minutes. Note - Coconut oil should be the consistency of soft butter like you'd use to cream with sugar and eggs in traditional cookies. If coconut oil is rock hard, microwave it in a small bowl for 5 to 10 seconds or just until it begins to soften. If coconut oil is runny or melted, place it in the freezer momentarily until it firms up. A tiny amount of runniness is fine; it's an oil and that happens. But do not use melted or purely liquid coconut oil because you can't effectively cream a liquid; it would be like trying to cream liquid butter.
2. Stop, scrape down the sides of the bowl, add the vanilla and beat to incorporate, about 1 minute.
3. Add 1 cup flour, corn starch, baking soda, optional salt, and mix until just combined, about 1 minute. If your dough seems quite wet, sloppy, or isn”™t combining, add up to another one-quarter cup flour, one tablespoon at a time, for a total of 1 1/4 cups. The dough shouldn”™t be sticky or tacky, and a little loose and oily is preferred to dry and crumbly. It should have a Play-Doh like consistency, and if pinched and squished, it”™ll stick together and to itself, but not to your hands. Over-flouring the dough will cause the cookies to be prone to cakiness and dryness.
4. Using a medium cookie scoop, form mounds that are 2 heaping tablespoons in size; or divide dough into approximately 18 equal-sized pieces. Place dough mounds on a large plate, and slightly flatten each mound. Get the dough mounds in the exact shape you want to bake them in because after chilling, flattening or re-shaping the dough is difficult. Cover with plasticwrap, and refrigerate for at least 2 hours; up to 5 days. Do not bake these cookies with dough that has not been properly chilled because they will spread.
5. Preheat oven to 350°F, line a baking sheet with a Silpat Non-Stick Baking Mat, parchment, or spray with cooking spray. Place dough on baking sheet, spaced at least 2 inches apart; I bake a maximum of 8 per sheet.
6. Bake for 7 to 9 minutes, or until tops have just set, even if slightly undercooked, pale, and glossy in the center. They firm up as they cool and I recommend the lower end of the baking range. The cookies in the photos were baked with dough that had been chilled for 2 days, left at room temp for 30 minutes to warm up slightly, then baked for 8 minutes, with trays rotated once at the 4-minute mark.
7. Allow cookies to cool on the baking sheet for 5 to 10 minutes before moving. Store cookies in an airtight container at room temperature for up to 1 week, or in the freezer for up to 3 months. Alternatively, unbaked dough can be stored in an airtight container in the refrigerator for up to 5 days, or in the freezer for up to 3 months, so consider baking only as many cookies as desired and save the remaining dough to be baked in the future when desired.
Tweet

Recipes by Course
Recipes by Main Ingredient
Recipes by Cuisine
Recipes by Preparation
Recipes by Occasion
Recipes by Dietary


Who loves our Healthy Recipes?

Quick Links
Main Ingredient
Preparation
- Copyright © 2016, CompleteRecipes.com
- Terms of Service
- /
- Privacy
